Overloaded by a sea of never-ending emails flooding your Gmail inbox? Fed up with sorting through the chaos to find those crucial messages that demand your attention? Fear not; Gmail rules are here to save your day and bring some much-needed organization to your inbox.
But wait, what exactly are these rules you speak of, and how can they possibly help me conquer my unruly inbox? Well, buckle up and get ready to learn, because we’re going to cover everything you need to know about Gmail rules. With a step-by-step guide on how to create rules in Gmail, you’ll be creating email rules like a boss in no time, and your inbox will thank you for it.
Today we’ll cover:
- What Are Gmail Rules?
- Why Are Gmail Rules Important?
- How to Create Rules in Gmail
- How to Create Email Rules in Gmail from an Existing Email
- Benefits and Use Cases for Rules in Gmail
- Conclusion
So, let’s get started!
What Are Gmail Rules?
With Gmail rules, you can automate and streamline the process of managing your emails, making it a breeze to stay organized and on top of things. Think of it as your very own email assistant, helping you to filter and sort through your inbox with ease.
Here’s how it works: you simply set up criteria based on things like the sender, subject, or keywords, and then specify what action you want Gmail to take.
ant all emails from your boss to be automatically labeled and moved to a separate folder? No problem! With Gmail rules, you can customize your inbox to work exactly how you want it to.
Why Are Gmail Rules Important?
When all your tasks are based on emails, and it’s your major resource for communication, it’s important to go through each email. But that creates a chance of human error as an average user receives more than 100 emails every day; there is a high chance one can miss 1 or 2 important emails.
This is why Gmail rules are important, as they help you manage your important emails easily. You can create multiple folders in which specific emails are filtered out. That way, you can prioritize which emails you must read first or the ones most deserving of your attention.
How to Create Rules in Gmail
Gmail rules can make your email managing task simplified. Now let’s see how to create rules in Gmail for your own to manage your inbox like a boss.
Step 1: Log in to your Gmail account
You’ve probably landed on this page because you have a Gmail account. Now’s the time to log into it 😉
Step 2: Go to the Settings menu
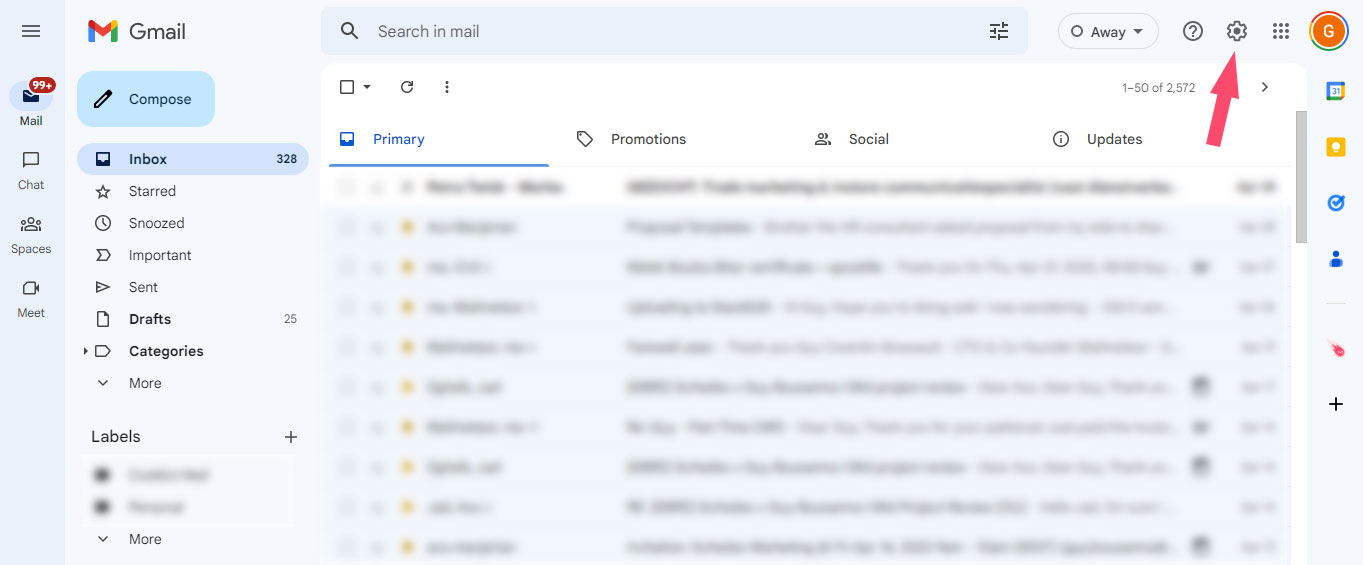
Great! Now that you have logged in to your Gmail account. Click on the gear icon in the top right corner. and select “See all settings” A new screen for “Settings” will open.
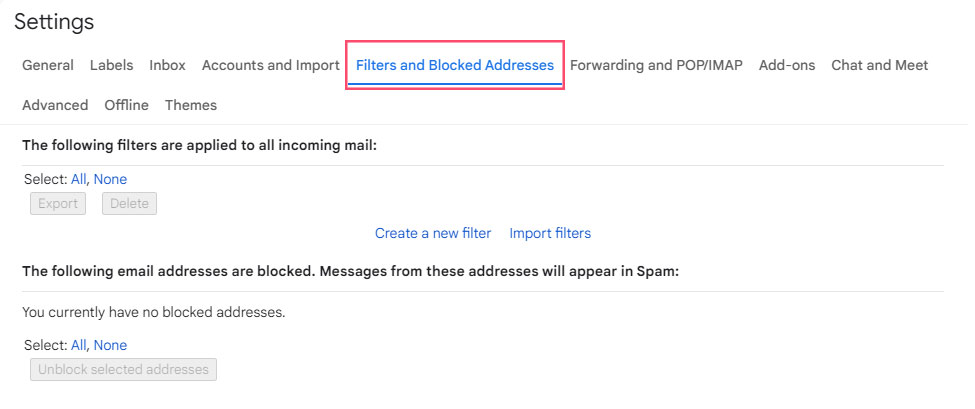
Step 3: Navigate to the “Filters and Blocked Addresses” tab
From the Settings menu, select the “Filters and Blocked Addresses” tab. This is where you will create and manage your Gmail rules.
Step 4: Create a new filter
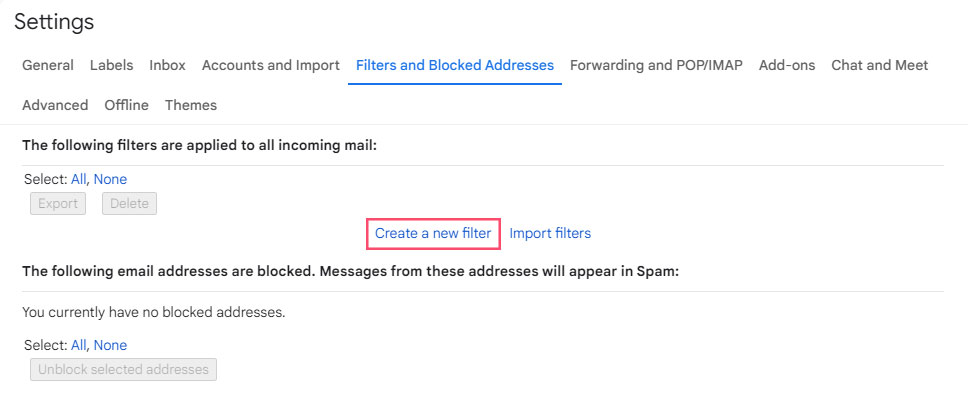
Click the “Create a new filter” button to create a new filter. This will open a new window where you can set up the criteria for your filter.
Step 5: Set your filter criteria
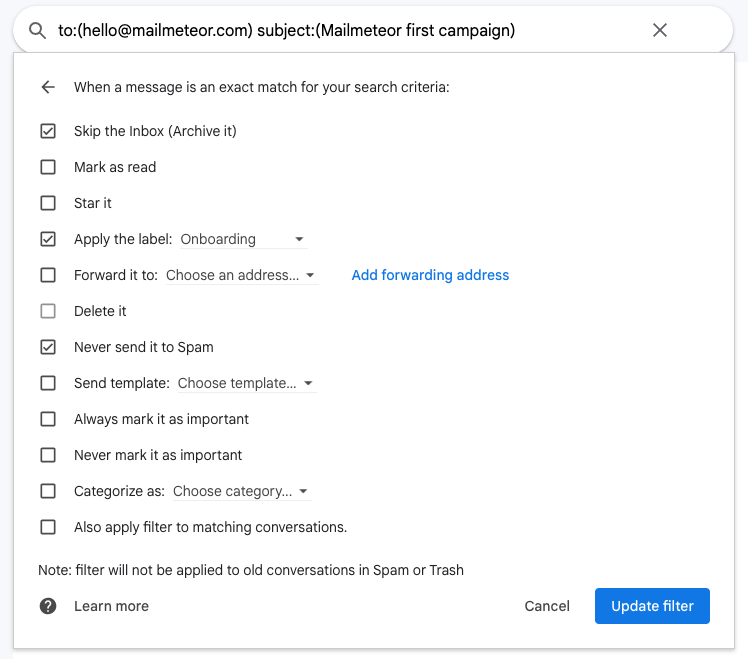
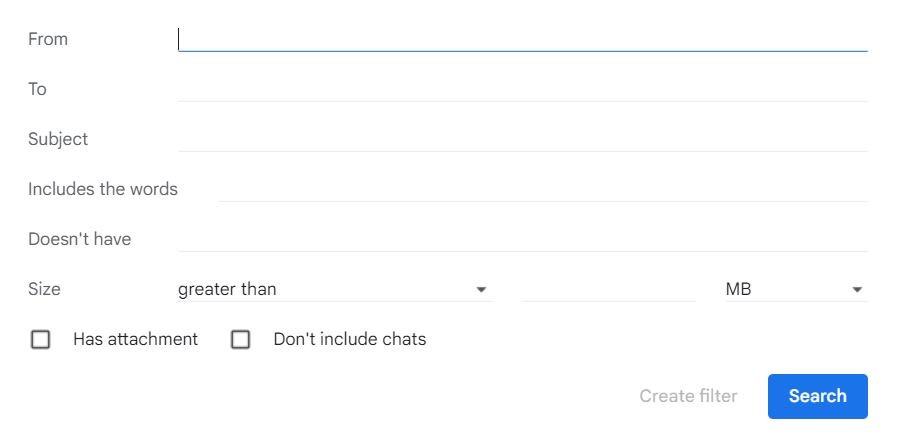
In the “From” field, enter the sender’s email address you want to filter. You can filter by other criteria, such as the recipient, subject, keywords, etc. Once you have entered your criteria, click the “Create filter” button.
Step 6: Choose your filter actions
Once you have set your filter criteria, you can choose what action to take when an email matches those criteria. For example, you can apply a specific label to the email, automatically mark it as read or unread, archive, delete, and more.
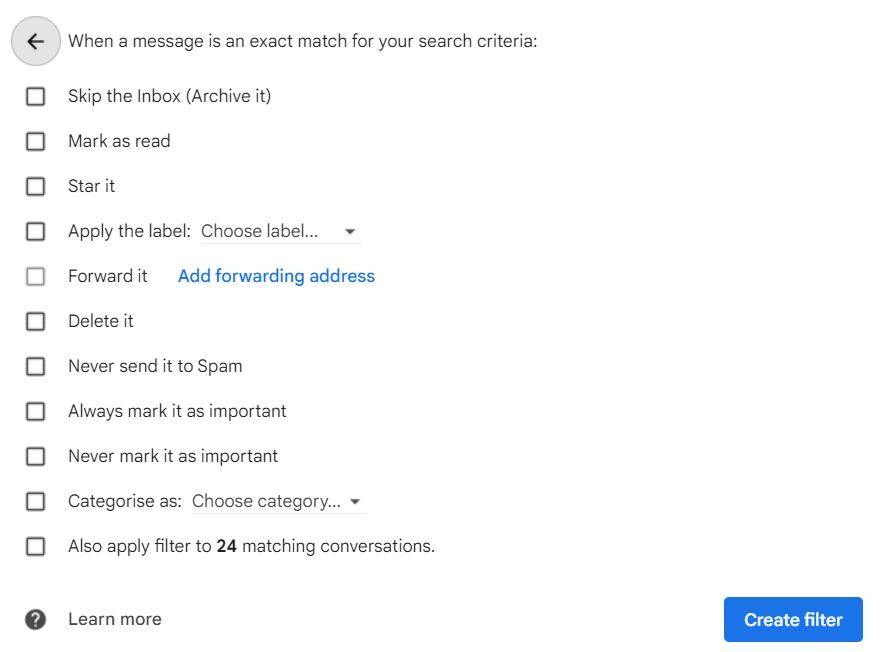
You can also choose multiple actions to apply to the email by selecting the appropriate checkboxes. Once you have chosen your activities, click the “Create filter” button at the bottom.
Step 7: Test your filter (Optional)
Select the “Also apply a filter to X matching conversations” checkbox to test your filter. This will apply the filter to any existing emails in your inbox that meet your set criteria. You can then click the “Create filter” button to apply your filter.
Step 8: Edit or delete your filter
If you need to edit or delete a filter, go to the “Filters and Blocked Addresses” tab in the Settings menu and locate the filter, you want to edit or delete. You can make any necessary changes or delete the filter from there.
How to create email rules in Gmail from an existing email
Creating email rules in Gmail from an existing email is yet another way you can put this functionality to work. Here’s how you can do that straight from your inbox:
Step 1: Open the email you want to create a rule for
Log in to your Gmail account and select an email by marking its checkbox, or open the email you want to create a rule for. This email will serve as the basis for your rule.
Step 2: Click on the “More” button
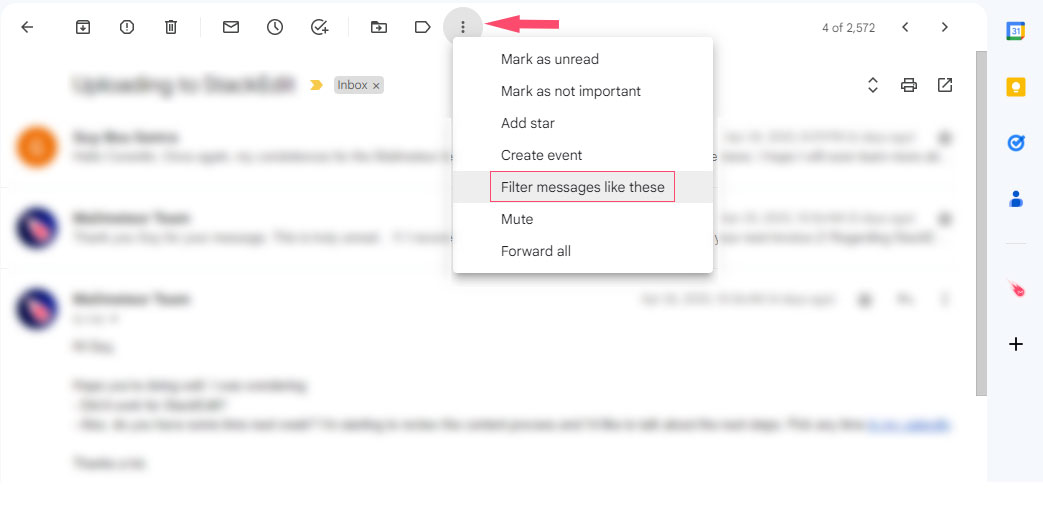
Click the on the “More” button (three vertical dots) in the top horizontal menu bar. A dropdown menu will appear.
Step 3: Select “Filter messages like these”
Select “Filter messages like these.”
This will bring up a new window with filtering options.
From here on, repeat steps 4 to 6 above:
- Create new filter
- Set criteria
- Choose actions
You can also apply this to all existing emails that match your criteria. (Step 7)
Benefits and Use Cases for Rules in Gmail
Now that you know how to set up your own rules, you can now turn your inbox into a smart automated assistant. Here are some ideas for the most productive ways you can use Gmail rules to your advantage:
1. Organize your inbox
You can use Gmail rules to categorize incoming emails into specific folders or labels automatically. Send your filtered mail into the right folders or categories, or take it to another level by creating groups and labels. When matched with your Gmail labels, your rules can power-up and organize your inbox by topics, clients, projects, priorities, etc…
2. Flag important emails
If you receive many emails daily, it can be easy to miss important ones. You can use Gmail rules to automatically flag important emails, such as emails from specific people or emails with certain keywords in the subject line. This can help ensure that you get all critical messages.
3. Mark emails as read or unread
Gmail rules can also automatically mark emails as read or unread. For example, you can create a rule that marks all emails from your boss as unread until you have read them so that you remember to respond.
4. Archive or delete unwanted emails
If you receive a lot of spam or unwanted emails, you can use Gmail rules to archive or delete them automatically. For example, you can create a rule that automatically archives or deletes all emails from a certain sender or with certain keywords in the subject line.
5. Auto-reply to emails
You can also use Gmail rules to reply to emails meeting certain criteria, automatically. You’ve essentially created a personalized auto responder that adapts to the sender.
Conclusion
Ready to take your Gmail game to the next level and simplify your email management? Now that you have all the steps to create personalized rules for your Gmail account, it’s time to put them into action! Automate your email filtering, streamline your workflows, and never miss an important message again. With these tips and tricks, you can take control of your inbox and keep it clutter-free. So, why wait? Start implementing these Gmail rules today and take the first step towards a more organized email experience!
